How to Use an Eyelash Curler Properly
Curly eyelashes are what we always dreamt of having. There are various options available in the market and salons that you can choose from to achieve this, depending on its longevity, appearance, and cost.
However, if you want the quickest and easiest way to have curly eyelashes, you must start using an eyelash curler. Continue reading to learn how to use an eyelash curler properly.
What is Eyelash Curler?
Eyelash curler is a handheld cosmetic tool with a small clamp that functions to pinch the upper eyelashes and curl them upward. This tool can easily transform boring straight eyelashes into a curly ones in just a snap.
Most women do not consider using an eyelash curler because they are afraid of having their lashes fall out. Little did they know that when this tool is handled and used the right way, it won’t damage their natural lashes that cause such happenings. And if you are here to figure out how to use them correctly, you are in the right article. Here is How to Use an Eyelash Curler Properly!
Also read:
- Eyelash Extensions Pros and Cons
- How To Clean Eyelash Extensions
- How Often Should You Apply Eyelash Serum?
Step 1: Search For The Perfect Eyelash Curler For You
Decide which one best fits your curling routine before you begin. Because there are so many options in the market, it’s better to find one that addresses your worries. To find the perfect eyelash curler, you must research.
The first decision you must make is whether to get the traditional manual curler or the heated version. Makeup artists, on the whole, appear to prefer the former. Although the heated version is excellent for those with straight stubborn lashes, it can cause irritation to your eyelids. To know what is the best eyelash curler for you, having all kinds of eyelash curlers tested in person is advised. If you have already found one, proceed to the next step.
Step 2: Start Off With Bare Eyelashes
While some people prefer to use their lash curler after applying a couple of coats of mascara, it’s ideal to start with bare and clean eyelashes. For the reason that, curling lashes that have already been coated in mascara might result in a crusty, gunky curler which can make it difficult to use or handle.
In order to avoid this kind of situation, remove any eye makeup you have first before grabbing your eyelash curler. This step is crucial in achieving the perfect curls without damaging the natural lashes.
In removing eye makeup, hold a cotton pad soaked in purifying micellar water over your eyelids for a few seconds, then wipe away any remaining eye makeup. Because it does not require rinsing, micellar water is a convenient cleaning solution.
Step 3: Tilt Your Head Back
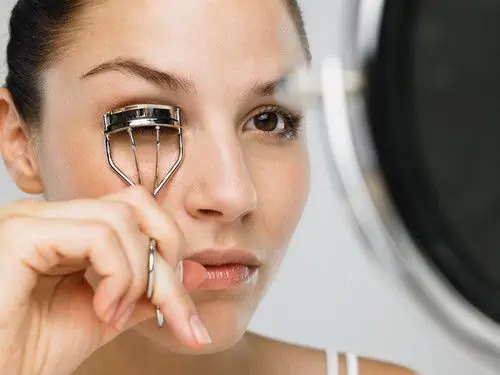
Tilt your head back and place your eyelashes between the cushioned eyelash curler clamp. The most unpleasant thing to happen is having your eyelid skin clamped along with your lashes. To avoid this, tilt your head back before placing all your eyelashes inside the curler. As a result of this, the natural curl will be formed.
When you’re pushing the curlers, make sure you’re using light pressure. When you press too hard on your eyelashes, they might bend at an odd 90-degree angle and even break off or fall out.
Step 4: Curl The Eyelashes Properly
In curling your eyelashes, you must start with holding the curler just like a pair of scissors and completely opening it. Put the tool towards your upper lashes while keeping your eyes open. Place your eyelashes between the padded base and the top, and aim as close to the roots as possible but not to the extent of pinching the skin.
For the first round of curling your lashes, you must keep the curler upright through the roots. Make sure that all of the lashes are inside the tool. Start clamping gently, carefully squeezing and pulsing in a light manner for about 10 seconds.
After completing the first clamp, line up the curler to the curve of your eyelid crease by turning its angle. Clamp down for the second time to get more curled rather than having crimped lashes as a result.
To avoid a sharp bend, proceed ing moving the curler up to the lashes away from the roots gently. Finish the perfect curl by wiggling the tool up to the tip of your eyelashes and closing it delicately with the exact same pulsating pressure you applied.
Repeat on the other eye to achieve beautifully curled eyelashes that are ready for a coat of mascara.
Step 5: Apply Mascara
Finally, apply your mascara, as usual, concentrating on the curl. It’s critical that this is done at the very end. Because of the sticky texture of the mascara, doing this before curling your lashes can pull them out. Place two fingers underneath your lashes to give your curl some extra punch. Drag and follow the curl of your lashes around with them to properly secure the curl.
Summary
This guide is definitely easy to follow and good for beginners as well. Share these steps with your peers for them to know how to use an eyelash curler properly. Let’s achieve perfect curly lashes together!